Google+ Mom to 2 Posh Lil Divas: Crafting
Showing posts with label Crafting. Show all posts

Saturday, February 1, 2014

Heart Themed Activities for Kids {The Sunday Showcase 2/1/14}


Valentine's Day is near and that means that hearts are everywhere.
The Lil Divas LOVE decorating and crafting for every little holiday.
That means there have been lots of hearts around our house lately.

Naturally, all the fun heart crafts, activities and decorations shared on last week's linky
caught my eye and I just had to share them with you.

Aren't these fabulous?


Click any of the links below for the full post and how-to's
on all these fabulous heart ideas.

(Joyfully Weary)


(Where Imagination Grows)


(Little Bins for Little Hands via B-Inspired Mama)

(Frogs and Snails & Puppy Dog Tails)


Such great Heart Themed Recipes & Activities!

Here are a few from our archives - 

(Mom to 2 Posh Lil Divas)


(Mom to 2 Posh Lil Divas)


(Mom to 2 Posh Lil Divas)


Looking for more Valentine's Day or heart ideas?
Check out our Valentine's Day Ideas Pinterest Board


Don't forget to peruse all of our Pinterest Boards.
They are filled with awesome kid friendly ideas from around the web.

---------------

Now it's your turn to share!
Do you have fun children's activities to share? 
Please share them with me in the linky, 
by commenting below or by visiting our Facebook page

Be sure to link up your child centered ideas while you're here.
I love to see what everyone is doing.


If you have been featured, grab a button you deserve it!

-------------------------------------------------------------

The Sunday Showcase is hosted on FOUR blogs!

Each blog showcases their own features so be sure to check them all out!

If you are here for the first time please read this informational post for the full details.  Anything kid friendly and/or child centered is welcome!  You are welcome to share more than one post,  but we don't accept links for giveaways,  shops, or downloads for purchase, etc.  They will be deleted.

If you're linking up we encourage you to visit other links 
& our Pinterest board!  

*Important* 
Please note that by linking up you are giving us permission to use a photo (with proper link to you!) in our featured section and on our Pinterest board!  

-------------------------------------------------------------

Link up and share your child centered ideas with us!
Bern

Wednesday, October 16, 2013

10 Frame Fun {with Pom Tree Kids Crafts Stickers}

This post is sponsored by PomTree Kids via The Blueprint Social. All ideas, activities and opinions expressed are our own. 

The Littlest Diva is a strong reader but math concepts do not come as easily for her. She is struggling with getting a handle on basic concepts so I've been trying to find fun, hands-on ways to make it meaningful for her in the hopes that things will start to "click" for her.

When we received our amazing box of goodies from PomTree I knew that aside from crafting, building and playing with their awesome sets I had to use their adorable stickers in some learning activities. The Littlest Diva loves stickers so I knew they would capture (and keep) her attention. 


Her first grade class is working on addition facts and learning how to make 10. The goal is to help them learn basic facts by memory in order to assist them when working with larger numbers. I decided to make a simple ten frame mat and utilizing the stickers from PomTree Kids we worked on making number sentences equal to ten. 


Ways to Make 10 
with Ten Frame Sticker Activity Mats


Materials:
Ten Frame Mats (download my 10 Frame Printable)
stickers
pencil


In order to practice basic 10 facts the Littlest Diva took out some of her favorite stickers from the tub - the felt animals and their accessories (they are super cute!). 

I printed out several copies of the 10 Frame Mat and using the stickers as our manipulatives the Littlest Diva got busy exploring all the ways we can make 10. 


In order to make it concrete she worked in order which helped see the number patterns.


After we reached 5+5=10 we talked about all the related facts. Using the stickers made it easy to see how the numbers were reversed.


I plan to utilize all these PomTree goodies for many more learning activities. The stickers are great from matching games, counting and math play, creating sticker stories and so much more.

Of course we also explored the awesome kits that came in our box. Oh, how I LOVE these kits. No glue, no mess and they come with everything you need. The only thing I had to add to our supplies was a scissor - that's it!


The Lil Divas immediately wanted to build the Pet Playset. It was a great activity because it's like a puzzle and involves problem solving and fine motor coordination to put together. The Lil Divas needed help with the swings but besides that they out it together using the photo on the box. They didn't even use the enclosed directions. They opted to go by trial and error which was wonderful. 


They have enjoyed playing with the playset many times over since they first put it together. It offers a wonderful opportunity to engage in creative/imaginative play. 


These no-mess, glue-free kits are great options for traveling, eating out or crafting at home. They can be used over time since the pieces fit together like a puzzle without any adhesive. 

We can't wait to use the other kits to make bookmarks, bracelets, headbands, play items for the Lil Divas dolls and so much more. Each kit has so many pieces that there are numerous ways to use them.

To learn more about PomTree Kids follow them on Facebook, Twitter and Pinterest

Guess what! I'm super excited to announce that the generous folks over at PomTree Kids are giving away 10 PomTree gift baskets worth $50.00 each. How amazing would it be for you to win one of these baskets? AWESOME!

Which set would you most like to try - a 3-D playset kit, creativity mega kit, sticker tub or a sticker storybook?

Enter to win via the Rafflecopter form below -

Good Luck, 
Bern


DisclosureThis post is part of a #sponsored campaign we participated in on behalf of PomTree Kids via The Blueprint Social. I received product samples and a promotional item as a thank you for participating. All opinions and experiences are 100% mine and honest. Your opinion and experience may differ.

Thursday, October 10, 2013

Building Essential Skills with Sewing

Disclosure: This post is sponsored by ALEX. I am an ALEX blogger and receive products for free. All opinions and experiences are my own - yours may differ.

The Lil Divas have been begging me to teach them to sew for months. Confession - this Mama does not sew! I have been putting it off for fear that I could not teach them to do something I wasn't good at myself but I recognize that it's something very beneficial for them to know how to do. I think everyone should at least be able to fix a seam, hem or patch a rip (thankfully I can do that if I really have to!) in a pinch. Aside from the obvious benefits of knowing how to sew because it is a practical life-long skill it is also a great way to help develop your child's hand/eye coordination and fine motor skills. Sewing is also a great way to boost their level of concentration, organization and planning skills and their ability to follow directions. 

How does a non-sewing Mama like me teach my curious girls how to sew and encourage them to tackle a project all their own? I had a little help from the ALEX My First Sewing Kit. This kit is packed with everything you need to tackle some fun first sewing projects including pre-cut felt, stuffing, fabric, needles, scissors, measuring tape, straight pins, buttons, rick rack, a thimble,  a pin cushion and more. 


Our first sewing project -  making the adorable stuffed animals of course! I worked with each Lil Diva, one-on-one, teaching them how to do a simple stitch. They caught on quickly and took the project very seriously. They really took their time, concentrated on each stitch and worked diligently to complete their stuffed animals. It was wonderful to share this first sewing experience with them. Having the kit made it so easy - everything was right at our fingertips including the easy to follow instructions. The kit has a suggested age of 7+ years but my 6 year old was able to do it with little assistance from me and she did a great job - especially for her very first sewing project.


The kit comes in a cute and colorful carrying case that not only provides great storage but can easily be used to take everything on-the-go as well. There are lots of sewing options provided in this compact kit. 


The Lil Divas can't wait to try their hand at something else and with the help of our ALEX My First Sewing Kit this non-sewing Mama actually feels like it's something I can help them do. While they are building all those essential skills, I'm building a few of my own. So while I may not be ready to sew our own clothes I can certainly feel proud of the new stuffed animals (made by our own hands) in our house. Who knows - maybe I'm helping nurture a future clothing designer or at least two sewing proficient Lil Divas. 


Have you introduced your children to sewing? What types of sewing projects have you tackled? I'd love some ideas for some simple, kid friendly sewing projects we can try together.


Bern

Sunday, July 21, 2013

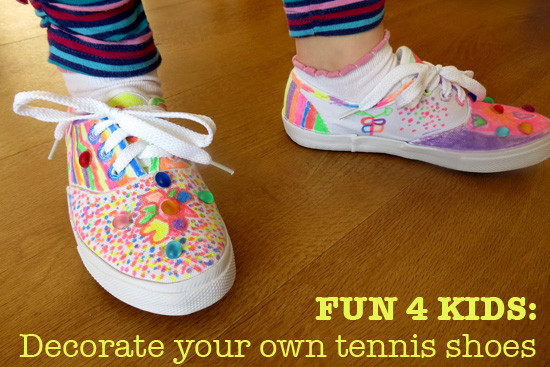
Kid Fun: Decorate Your Own Tennis Shoes

One of the things I LOVE best about childhood is the ability kids have for embracing individuality and having fun. The Youngest Diva gravitates towards bright colors, sparkles, jewels, ruffles, etc. She can put together an outfit that would make your eyes hurt and not only pull it off but bring it to life with her confidence. I truly love this about her and I hope it is something that she carries with her forever. Christie from Childhood 101  is one of those mama's that not only embraces that spirit of childhood but celebrates it. Today, she is here to share a fun DIY Craft for Kids - Decorating Your Own Tennis Shoes. This is the kind of activity that I know the Youngest Diva would be really excited about. 

Here's Christie......

Childhood 101_Fun for kids-Decorate your own tennis shoes

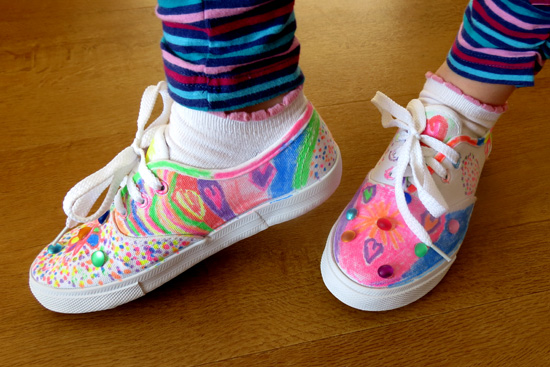
My five year old daughter has been eying a pair of brightly coloured sneakers at a local shoe store for a while now.  Unfortunately, each time we have inquired, her size has been unavailable. To say she was excited when I suggested she could design and decorate her very own pair would be an understatement! This project was a lot of fun and took a number of sessions over the course of about a week to complete. Now that they're done, I can't get her to take them off!

You will need:


Childhood 101_Decorate tennis shoes
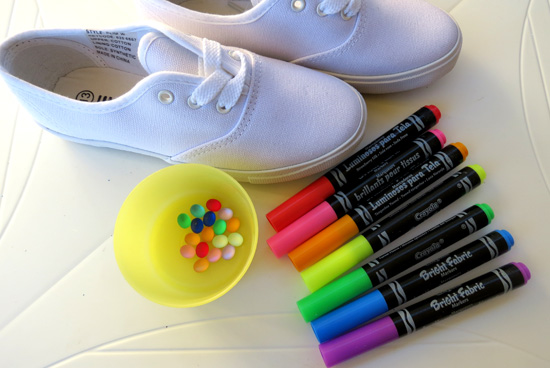
  • A pair of white canvas tennis shoes
  • A set of fabric markers - we used Crayola's Bright Fabric Markers
  • Small, decorative costume jewels (optional)
  • Hot glue gun (optional)
To make:

  Childhood 101_Decorate your own canvas tennisshoes

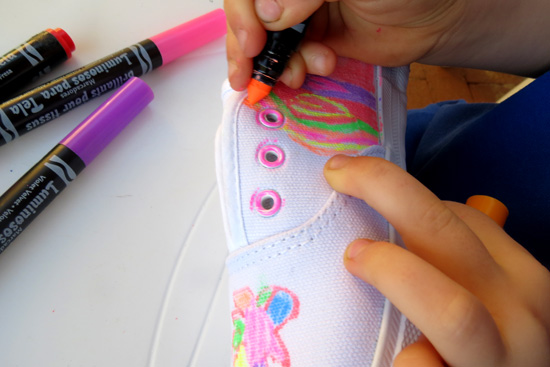
1. Remove the shoe laces and adorn the shoes with your very own designs using the fabric markers. 2. Follow the manufacturer's directions to heat set the design. Our markers required putting the shoes in the tumble dryer for 30 minutes.

  Childhood 101_Ideas for decorating shoes 

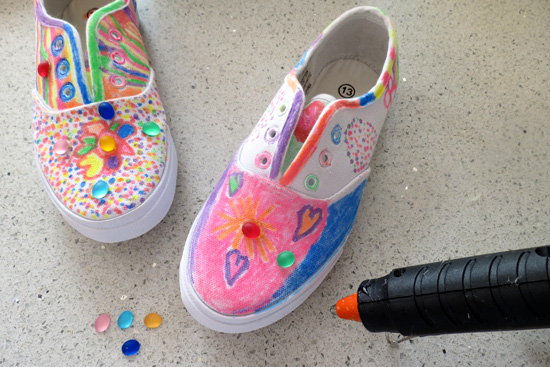
 3. Glue jewels into place with hot glue. 4. Re-thread the shoe laces and you are good to go!

  Childhood 101_Decorate canvas tennis shoes

Do you know a young person who would enjoy designing and decorating their very own sneakers?

c101_buttonplg_180FB

Christie Burnett is a qualified early childhood teacher and mum of two very busy, little girls who shares her parenting adventures and passion for play and early childhood education on her award winning blog, childhood101.com. Her first book Time to Create: Hands-On Explorations in Process Art for Young Children is now available internationally through all major online booksellers, including The Book Depository, Amazon and Fishpond.

Monday, July 1, 2013

Wet Chalk Tape Resist Art for Kids

One of our favorite art activities involves using wet chalk. It's a fun medium to work with anytime but when you add in some tape resist - it's just downright awesome.


What You Need:
Chalk
Water
Tape (I used blue painter's tape I had on hand.)
Paper (I used black construction paper this time but you can also use card stock - it's sturdier.)

What To Do:
Use your tape to create a pattern on your paper.


Wet your chalk and use the wet chalk to paint/color the exposed parts of your paper.


Allow your art work to dry.


Remove the tape and behold your masterpiece. It did pull the paper a bit because I used construction paper but our finished products still looked great. My tips would be to wait until your paper was dry to remove the tape (wet paper rips easily) and remove it slowly to minimize and tearing.


Aren't they FABULOUS!


This is a great activity for kids of all ages and there are so many possibilities for what you can create. 

Have fun creating,
Bern

Friday, June 28, 2013

Easy Craft Stick Bookmark Craft for Kids

Reading is a priority for us. We enjoy reading together and it's something we do daily but I have to admit that it gets a little hard to keep up with our daily reading during the summer. To keep the Lil Divas motivated to read this summer we are taking in part in a few awesome summer reading programs, delving into some fun new chapter book series and enjoying lots of crafts and activities.

One of the crafts we recently enjoyed was making our very own personalized bookmarks. I wanted to encourage reading and give the girls a chance to express themselves creatively. We all loved how they turned out. The bookmarks were super to make, each one was unique and it served as great mommy-daughter time because even I made one.


What You Need:
Jumbo Craft Sticks
Sharpie Permanent Markers (Assorted Colors)

What To Do:
Provide your child with the craft sticks and markers and let their creativity be their guide! The great thing about this craft is that they can do whatever they like - draw a picture, create a pattern, write words, etc. It's entirely up to them.

Here's what the Lil Divas and I made:


Aren't they fabulous?! We LOVE them and all 3 of us have been making daily use of our personalized bookmarks.


What will you & your child(ren) create?
Bern

Disclosure: This post contains affiliate links. Although they have been added for your convenience, I do receive a small commission for items purchased via my links. Thank you.

Wednesday, February 27, 2013

Wet Chalk Tape Resist Easter Egg Painting

My preschoolers love drawing with chalk - on our chalkboard, on the pavement outside, on our classroom writing table and of course on paper. I just knew they would enjoy drawing with wet chalk. So, when I was planning some Easter activities I decided to combine two (2) things they enjoy - chalk and tape!

Wet Chalk Tape Resist Easter Egg Painting


I cut out large egg templates from card stock. Then I provided the children with the template, tape, scissors, chalk and some water. The children used the tape and scissors to make a design on their egg template.


Once they had their desired design, they began using their chalked dipped in water to paint.


I loved all the colorful eggs that the children made. Some separated colors by sections using many colors, some used 2 or 3 colors and others just happily scribbled many different colors all over the eggs. Whatever their chosen method - they all enjoyed the process and each egg was unique.


We let the eggs dry before taking the tape off because with the wet paper and tape I was worried about rips and tears. Once the eggs were dry, the tape was relatively easy to peel off. 

Lovely! Isn't it?


Have you given wet chalk painting a try?
Bern

If you enjoyed this activity be sure to check out our other Easter activities, our kid crafts and our Easter Pinterest Board for even more fun ideas and activities to try with kids.

Friday, December 21, 2012

Kid Made Swirl Paint Christmas Ornaments

I hope you have been following along with the Creative Christmas Countdown hosted by Creative with Kids and Red Ted Art - it has been amazing!


Today, it is our turn to share on the countdown. Last year, I shared our Gingerbread Houses on the countdown and the valuable lesson I learned from the whole activity.  Psst, this year I went straight for the pre-made kit and it was fabulous.

This year, I asked the Lil Divas what they wanted to contribute and they knew they wanted to make ornaments. Making homemade holiday ornaments is one of our favorite activities to do together during advent. Having already made salt dough ornaments, cinnamon apple sauce ornaments, bead ornaments and craft stick ornaments we wanted to try something different.

I have a few boxes of old clear ball ornaments that I have been saving for the last few years and I wanted to find a way to reuse them versus giving in to my husband and finally throwing them away for not using them. I wanted to make fun snowmen ornaments out of them using glitter, white sparkles and epsom salt for the inside but the Lil Divas nixed my idea. They wanted to paint the ornaments themselves.

We started trying to paint the outside of the ornament but it was messy, hard for the Lil Divas to handle and would take a long time to dry. So we decided to add paint to the inside of the ornaments.


Supplies:
clear ball ornaments
multi-colored acrylic paints
plastic cups

What To Do:
1. Remove the top from your ornament to reveal its opening.


2. Pick 2-3 colors of acrylic paint to use in the ball.  Pour some of each paint color you chose inside the ornament. The Lil Divas were pretty liberal with their paint pouring and we had quite a bit of excess.


3. Put your thumb over the top and gently swirl the paint around inside the ornament until the ornament is completely coated in paint.

4. Let your ornament dry by putting the newly painted ornament upside down in a plastic cup for approx. 48hrs. The excess paint will drain out of your ornament and into the cup while it hangs upside 
down.


5. Once they are dry go ahead and ooh & ahh over your gorgeous ornaments. 


6. Hang on your tree and enjoy!


These really add a colorful punch to your tree and would make great gifts. Have you tried painting your old ornaments? Have you made a homemade ornament this year? I'd love for you to share with me.

Be sure to follow along on the last few days of the Creative Christmas Countdown. We're almost there!

Bern