Summertime is a wonderful opportunity to review those skills that were learned in the previous school year. And what better way to review than through play? Last summer, we spent one morning a week reviewing sight words. We've repeated a few of those simple games this year and added a few more. One of those games was this easy sight word activity with spinning tops {obtained in a fast food kids' meal}. It was a hit with all three of my older kids!
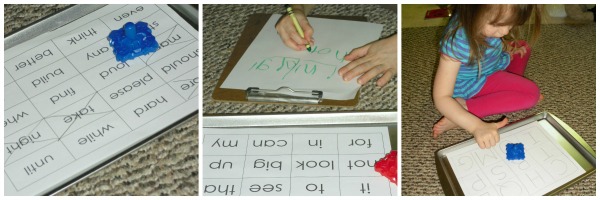
To prepare: I took a piece of paper and created a 4 x 5 table of sight words from my son's 1st grade year {I picked a few "easy" words, but also sprinkled in some words that were still tripping him up a little.} For my younger son {age 4}, I printed off a 4 x 4 table of sight words from my Reading the Alphabet curriculum. To cut down on prep time, tables and words could totally be hand-written! I placed each paper into a metal cookie sheet.
To play: My boys spun their tops on the table of words within the cookie tray. When it stopped, they simply read the word aloud and spun again.
To extend:
My oldest son began to cross off each word, hoping to get his x's in a row, which made me think this might be kind of fun to play with your child {or sibling}; one person crosses of in one color crayon and the other in another color to see who can get a row first. My younger son actually grabbed a near-by crayon, paper, and clipboard and began writing every word that the top landed on. The boys were enjoying themselves so much that my daughter {3 years old} asked to join in. I quickly drew a chart for her with letters and she went to town, spinning her top and calling out letters.
To Adapt: Don't have any tops lying around? Ask your child to stand back a couple of feet and toss a coin onto the cookie sheet and call out the words as it lands! It really is that simple.
Becky Spence is a homeschooling mama to four little blessings. She is passionate about teaching, specifically literacy. She is the author of This Reading Mama, where she shares reading and writing activities as well as free literacy curricula and printables. You can connect with her on Facebook, Twitter, Pinterest, and Google +.
Sensory Bins are amazing! They bring so much hands-on and creative play to life for children. I enjoyed setting up huge invitations to play in the water table of my preschool class but you can do it on a much smaller scale at home in a plastic container for one or two children to enjoy. Today OneMommy from There's Just One Mommy is sharing a fun Construction Themed Sensory Bin that is sure to be a hit with the dirt and digging lover(s) in your life. Here's OneMommy....... If you have a little boy in your life, chances are he like cars (or trucks), and there's a good chance he likes a little dirt, too! Why not put the two together for the ultimate little boy sensory bin? We created our construction truck sensory bin so there is always a chance to play in the dirt, no matter what the weather. (Plus, it keeps my preschooler from digging in my flower bed, too!)
Before starting construction, I searched the recyclables bin. I found a small cocoa can and removed the bottom. This would become our tunnel later.
I also found a couple plastic lids. I decided the larger of the two would become a pond and cut the smaller one to become a bridge, which I hot glued across the top.
My little helper decided his bridge shouldn't advertise margarine, so I hot glued some felt across the top before adding our pond to the construction site.
I found a large, shallow storage container to use for the sensory bin. We started off by putting a few shovels of dirt in the bottom. When I couldn't get the dirt to stick to the top of our tunnel, my husband suggested we make a few cardboard retaining walls.
The retaining walls held the dirt in place perfectly!
Some gravel from the driveway, a few small plants, miniature construction signs, and a few cut up drinking straws acting like pipes, and the construction zone was ready for business!
The workers couldn't wait to get started building.
The best part of the sensory bin is that it is easily stored in the garage, ready for the next play session. Looking for some other sensory fun? Check out our Sunshine Sensory Rice!
OneMommy can be found at There's Just One Mommy, where she blogs about life as a SAHM to her 4 year-old son and 5 year-old daughter. She writes about the funny things kids say/do, simple kid crafts, learning activities, and more. You can also find her on Facebook and Twitter.
If you are a longtime reader you know I am passionate about active, playful learning. I firmly believe kids learn best when they are actively engaged. As part of our Get Ready for K Through Play series I'm sharing 20 FUN activities and games that you can do/play with your kids to strengthen their phonics and alphabet skills. Why? They will be working on this A LOT in kindergarten - why not get a head start in a fun, playful way.
20 FUN Alphabet & Phonics Activities for Kids 1. Make some letter cards, turn up the music and play a Musical Alphabet Game (Mom to 2 Posh Lil Divas).
2. Dig for Letters(Sugar Aunts via Mom to 2 Posh Lil Divas) in dirt, sand or rice - once found encourage child to name them, say the letter's sound aloud and possibly even make simple cvc words (i.e. cat, sun, fan) or spell known sight words if possible.
4. Have some fun with plastic letters and mushy water beads and mix up a batch of Alphabet Goo (Learn with Play at Home). It's a fun & sensory way to practice letter recognition and sounds.
5. Do you have a cookie tray and some magnetic letters? Then you can play and learn with them like Mess for Lessdid to reinforce letter recognition, ABC order and more.
6. Build a tape spider web on the floor and play an ABC Spider Web Game. (Mom to 2 Posh Lil Divas)
7. Get kids up & moving by playing ABC Slam (Toddler Approved)
8. Play and learn with Alphabet Soup. (Playdough to Plato)
9. Kids will have a great time practicing letter recognition and working on sounds with an Alphabet Squish activity. (I Can Teach My Child)
10. Play Alphabet Eye Spy with this fun slime recipe from Growing a Jeweled Rose.
11. Practice phonemic blends with Word Rolls. (Laughing Kids Learn)
12. Take rhyming play on the go with a Car Phonics Game. (Mom to 2 Posh Lil Divas)
Have you ever met someone that just seems so full of life and energy that you instantly feel the same way just being in the room with them. That's what I imagine today's guest blogger, Debbie Clement, is like in real life. I am lucky to "know" Debbie from the blogosphere and she has an amazing presence, astounding enthusiasm for her work and children and such a big heart - it shines through in all she does. Today, I am happy to introduce her to you and let her tell you a bit about herself and her amazing work. Debbie is even giving away signed copies of her books to one lucky reader. Without further ado, here's Debbie......
MEET DEBBIE CLEMENT: Author and Illustrator, Music Lady
Thank you so much, Bern, for the opportunity to introduce myself to your readers here at your amazing blog. I'm becoming something of a Diva myself, in my 'maturity' years. I've been getting pointers from your Diva daughters all along! I wear a lot of hats! Before this article is over maybe I can earn an honorary "Diva Debbie" title. Here's some evidence of my early diva status.
"Diva Debbie" in mom's heels and gloves from an early era
It's good to be able to laugh at yourself! I am the hardest working diva, that you've never heard of before! Yes. I have written and recorded over 100 original songs for children. Yes, I have turned three of my songs into the traditional hardback picture book format. Yes. I have won national awards. Yes. I travel the country (and the world) sharing my work with educators and parents. Yes. I will be give the opening KEYNOTE for the national Kindergarten conference! Yes. I realize. You've never heard of me...... [unless you're a blog stalker or active on Pinterest.] Yup. The life of a diva-in-the-making. So I'm especially grateful to have the opportunity to introduce myself.
My book's text are the lyrics of my songs. To make the bridge between 'singing' and 'reading,' my books include a CD insert of the song inside the cover. The young child first becomes mesmerized with the beat of the music and then quickly joins in with the repetitive lyrics. After a few trips through the song and book combo, the early reader begins to notice that those print hieroglyphics relate to the words being sung. Before you know it the child exclaims, "MOM, I'M READING!"
GeeGee and my own 'WonderBoy' in Concert Together!
It is just that joy and burst in confidence that delights me. As a parent, grandparent and teacher-of-teachers, it is that "Aha Moment" when all the dots connect, that a quantum leap of 'academic' progress is made. Let's connect the dots! Let's sing and read. Let's dance and read. Let's sign and read. Let's paint and read. Let's laugh and read. Well. You get the idea!
Music is such a powerful tool. I've written about it as a 'motivator' in this article. I've written about how to add choreography to songs and why there is so much significance in crossing the midline. My songs are filled with rhyme and repetition. There is all sorts of documentation about why and how rhyme relates to reading. I took a long hard look at those connections in this "TOP 10 LIST: Importance of Rhyme" that was developed for the Kid Blogger Network -- where our hostess Bern and I first met. That list is filled with inspiration for parents (and grandparents) to 'play' with rhyme as the day unfolds.
Let's take a look at how I translate my songs into picture books.
The illustrations that fill my books are made from fabric as small quilts that I have designed and sewn together. You know that you're a developing diva when a school building filled with 330 kindergarten students haveresponded to your graphic quilts by making a colossal collaboration to welcome you into their midst. This gigantic quilt spanned across their entire gymnasium! It is in response to my first picture book entitled, "You're Wonderful." The former art teacher in me rejoices to see such a spectacle! Here's a YouTube video shot in front of that very backdrop! We're singing my classic song, "Glad I'm at School Today!"
That's my favorite thing. To walk into a new school and see the work that students have created in response to my projects. My second book is entitled "Tall Giraffe" and features amazing photographs of this beloved animal in Africa. The photos are framed by African fabrics that were 'digitally quilted' on the computer.
This whole book is the effort of a 'family project.' My niece took the giraffe photos for me on her mission trip to support children with AIDS in an African orphanage. Her mom/my sister worked at length behind the scenes to help me with the book's layout and design. Then my husband acted as 'publisher' and brought the work all together in finished form. YEAH, team! Now take a look at my newest baby. Another labor of love. My newest picture book "Red, White and Blue" is patriotic, in that I wrote the song in the immediate aftermath of September 11th. It celebrates the flag and the diversity of our country: in both our geography and our people. It took me years to bring the book format to fruition. (I am a two time survivor of early stage Breast Cancer and that slowed me down considerably.) Imagine my emotions to see this project unfold in kindergarten in response to my book.
The pieces of the enormous quilt pictured above were ALL made from marble painting on construction paper!!! Carie, the teacher that directed this project is an Army veteran that served active duty in Iraq and now teaches her kindergarteners the importance of respect for the flag. {Does that add some Diva points? It certainly adds to my legacy.}
Yes. I could go on and on and on. I have five years worth of blogging articles that document the most recent of the past seventeen years since I launched my company. In summary? I'm all about bringing the arts into the lives of children. I focus on how we can use the Arts as a springboard to literacy. I'm passionate about process over product. {I've traveled to Europe to sing with the children of our troops stationed abroad and got to tour and perform in Reggio Emilia, Italy while there.} I urge teachers and parents to support the creative process. I've dedicated my career to finding ways to support ALL learning styles in every child. I want every individual to know that they are 'wonderful.'
Collaboration is where it's at! There's power in collaboration. I am the 'editor-in-chief' for the collaborative blog, "PreK+K Sharing." We have over 30 authors who contribute regularly from their area of expertise. Most recently we have opened a collaborative 'store-front' of materials suitable for this age group. We call it our Early Education Emporium. The links in today's article direct you to this collaborative effort. I am now uploading 'digital versions' of my work for your immediate download.
My newest technological adventure is to make Author-Illustrator SKYPE visits! I just began this newest technological journey as the school year ended and have already visited 10 different schools by virtue of this amazing and immediate transport. I've gone from the Virgin Islands to California and Maine to Texas visiting via computer projected to large screen. The visits are completely 'do-able' and available for your consideration. I can't wait to see where I get to 'visit' in the coming year!
Thanks for taking the time to allow me to introduce myself! I'd like to reward one lucky winner with a signed and personalized set of all three of my picture books. Follow the Rafflecopter directions to enter. Good luck!
By all means follow me on Pinterest! I now have 127,000+ followers on my boards. My pinboard collections are organized around my books, DVD, and songs. I host several collaborative pinboards that are all the rage. As you might expect I have one for "Children's Art" and another for "Writing and Fine Motor" that are especially popular!
Here's the progress that I'm making on my VEGAS ensemble
for my National "I Teach Kindergarten" KEYNOTE!
Your creative process as an adult is significant to me as well. I offer my blog as a storehouse of inspiration and motivation for you and your own creativity. I'll conclude with offering you this article for making your own dreams come true. It includes my reflections following my first national keynote address. Dreams really do come to fruition, but they require focus and determination, regular work and patience. Having the support of others as you make progress is pivotal for the journey. I'm appreciative to my fellow bloggers (and Bern in particular) for their continual encouragement and support.
During my 15+ years as an educator (wow, has it really been that long?!) I have had the privilege of teaching various grades from 3yr olds at the preschool level thru 3rd grade. I've seen lots of bad handwriting habits in that time. Why? Many children feel that practicing handwriting is a chore, an unwanted burden and something they dislike spending time on. With all the technology and electronic devices we have today, it almost seems like handwriting is becoming irrelevant. To me, it isn't. The ability to write takes fine motor development and increased control over a child's small motor movements. These are important skills to develop in children. Yet, I feel that less and less time is being spent on teaching children how to properly form letters and write. Do you know that it is harder to unteach a child the wrong way to make a letter than it is to teach them the correct way from the start. I can not tell you how many children I have come across that have made up their own way to write letters. It usually involves lots of extra and unnecessary steps and often results in illegible handwriting. As a teacher (and a mom) I am going to tell you that it is important to sit with your child and model how to properly form letters. It will help them greatly in school. Are you thinking this is a tedious task and simply not easy to do? Hopefully, I can offer some help that will make it easier for both you and your child(ren). Here's how - I am excited to share 55 ways that you can utilize at home (and in the classroom!) to make handwriting practice FUN and actually get kids to do it without groans and grumbles. Seriously! Get ready to think outside the box, ditch your standard pencil and white ruled paper for a change and simply have fun practicing writing.
I'm not saying you should ditch the pencil and paper completely. Obviously, they are necessary. I'm simply here to remind you (or perhaps show you for the 1st time) that it is not the only way to get kids writing.
As I introduce children to letter formation, I have always preferred a hands-on approach using manipulatives. Even before children can properly grasp a pencil they can practice this way and get a feel for the way a letter should be formed. I model the correct formation with the children and then let them explore and in essence "create" letters.
Use Manipulatives to teach/reinforce letter formation - 1. Craft Sticks 2. play dough (try making your own!) 3. small stones, gems and/or rocks 4. stickers 5. cheerios 6. M&M's
7. Pipe Cleaners 8. Wikki Stix 9. bottle caps 10. cooked spaghetti 11. yarn/string 12. beans 13. cotton balls 14. small strips of paper 15. twigs, sticks 16. small erasers 17. Unifix/Snap Cubes
or Wood Counting Cubes 18. cookie cutters dipped in paint 19. flower petals and/or small leaves 20. q-tips and/or toothpicks You don't even need a pencil and paper to practice handwriting! Break out of your comfort zone and let your children have fun practicing forming letters in/on - 21. shaving cream 22. salt tray 23. rice tray 24. ziploc baggie filled with Paint 25. ziploc baggie filled with hair gel 26. Finger Paint 27. pudding 28. icing 29. sand 30. dirt Let them use their fingers or a paintbrush to practice the strokes. This is tactile and a great way for them to remember how the letter is formed. Later, when they are ready for the pencil they will have a solid starting point and know how to properly form those letters. Yay! Doing the same old paper and pencil practice over and over again can get boring for everyone. Get creative, get up off the table and have fun writing on - 31. the sidewalk (use chalk, chalk paint or a paintbrush & plain water) 32. a mirror (use dry erase markers) 33. a Magna Doodle 34. a Dry Erase Board 35. the windows (use window crayons or markers) 36. the bathroom tile (use dry erase markers) 37. a Chalk Board (use chalk, a paintbrush & water or fill/color in chalkboard with chalk and invite child to write using water and a paintbrush) 38. the air 39. your back (with their finger) 40. the dirt with a stick 41. Sheet Protectors
with Dry Erase and/or Wet Erase markers 42. a Geoboard
with rubber bands Practicing writing doesn't mean you have to sit at a table. Many younger children are resistant to sitting and practicing. Those same children may delight in writing in dirt with a stick while playing outside, tracing letters on your palm or back as you cuddle in bed before bedtime or writing on the tile walls in the bathtub during bath time. You'd be surprised at how much more fun writing is when you simply do it at a different time or place than expected. Try it! Stuck on the traditional pencil as your "go to" writing tool? Changing your child's writing tool can make all the difference. Why not use some different (ak.a fun) tools to practice writing - 43. Crayons (you could even try making your own recycled crayons to use!) 44. Chalk 45. Washable Window Crayons
and/or Washable Window Markers 46. Markers (colored, Dry Erase and/or Wet Erase) 47. Colored Pencils 48. glue bottles (add food coloring or watercolors to your glue for extra fun or just cover it in glitter for added sparkle) 49. fingers (i.e. finger-painting, using fingerprints and an ink pad, finger-writing in the air or on your back) 50. q-tips (dip in paint or water) 51. small sponges (dip in paint or water) 52. Do A Dot Markers (Bingo Daubers) 53. cars with wheels dipped in paint 54. Quill Feathers
dipped in paint or ink. 55. Paintbrushes (use with paint or water)
Go ahead and grab some different materials, change up the work space and have fun teaching your children how to write. It will prove to be invaluable in Kindergarten and there's no better way to get ready for K than through play!
Thank you to My Cute Graphics for the use of the superhero kids graphic.
This post is part 6 of an 8 week series being hosted on 6 blogs to help kids Get Ready for K Through Play! In previous weeks we discussed:
Disclosure - This post contains Amazon affiliate links for your convenience. I do receive a small payment when purchases are made via my links. Thank you.





 with
 with


 dipped in paint or ink.
