Google+ Mom to 2 Posh Lil Divas: guest posts
Showing posts with label guest posts. Show all posts

Tuesday, July 30, 2013

Top That! A Sight Words Game


Top That! with Sight Words
Summertime is a wonderful opportunity to review those skills that were learned in the previous school year. And what better way to review than through play? Last summer, we spent one morning a week reviewing sight words. We've repeated a few of those simple games this year and added a few more. One of those games was this easy sight word activity with spinning tops {obtained in a fast food kids' meal}. It was a hit with all three of my older kids!

To prepare:
I took a piece of paper and created a 4 x 5 table of sight words from my son's 1st grade year {I picked a few "easy" words, but also sprinkled in some words that were still tripping him up a little.} For my younger son {age 4}, I printed off a 4 x 4 table of sight words from my Reading the Alphabet curriculum. To cut down on prep time, tables and words could totally be hand-written! I placed each paper into a metal cookie sheet.

To play:
My boys spun their tops on the table of words within the cookie tray. When it stopped, they simply read the word aloud and spun again.

To extend:
top that sight words collage

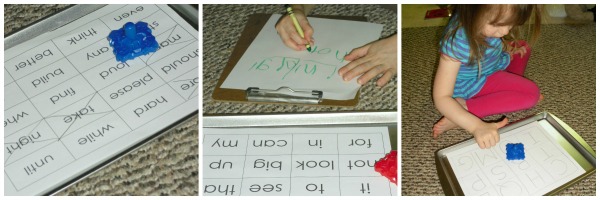
My oldest son began to cross off each word, hoping to get his x's in a row, which made me think this might be kind of fun to play with your child {or sibling}; one person crosses of in one color crayon and the other in another color to see who can get a row first. My younger son actually grabbed a near-by crayon, paper, and clipboard and began writing every word that the top landed on. The boys were enjoying themselves so much that my daughter {3 years old} asked to join in. I quickly drew a chart for her with letters and she went to town, spinning her top and calling out letters.

To Adapt:
Don't have any tops lying around? Ask your child to stand back a couple of feet and toss a coin onto the cookie sheet and call out the words as it lands! It really is that simple.


Becky Spence is a homeschooling mama to four little blessings. She is passionate about teaching, specifically literacy. She is the author of This Reading Mama, where she shares reading and writing activities as well as free literacy curricula and printables. You can connect with her on Facebook, Twitter, Pinterest, and Google +.

Monday, July 29, 2013

Melting Crayons {Kid Science Experiment}

The Lil Divas love experimenting and exploring with science. We have shared lots of fun science activities with you and today one of my favorite bloggers Jillian from A Mom With a Lesson Plan is here to share a fun Melting Crayons Experiment.  Here's Jillian....

Yeah! I am so excited to be with all of you on Mom to 2 Posh Lil Divas today. Bern always has the greatest playful learning ideas and that is where my passion lies! I created A Mom with a Lesson Plan almost three years ago as place to share the fun things I do with my kids (Big M almost 8 and Little M 6). Kid science is one of our favorite things. It's been so hot out that a sun vs. shade experiment seemed like the perfect way to play around with science... plus we had a bag of crayon pieces just waiting to be used for something fun. Crayons + Sunny day = Melting Crayons Experiment. YIPPEE!

Melting Crayons {Kid Science Experiment}

What you need: crayon pieces, large water bottles (or other plastic container), paper and pencil, sunny spot and shady spot.

To prepare the containers I cut down two large water bottles using a box cutter (then I realized kid scissors are much easier... go figure). We peeled the paper off the crayons and sorted them into the two containers.

  Melting Crayons... easy and fun backyard science

One container was placed in a sunny spot, the other in a shady spot. We talked about how the sun moves through the yard during the day. It ended up being a great exercise in sun movement and recollection. We picked spots that we thought would remain in the sun (or shade) the longest.

Melting Crayons... easy and fun backyard science

With the timer set we went about our day. (Setting the timer makes it easier for us to walk away from day long experiments without completely forgetting about them.) Each time the timer went off we ran... okay I did NOT run but the kids did... outside to check on the crayons.
We looked and then felt to see if anything had changed. Then we talked about what was happening or not happening.
After an entire day the crayons in the sun had melted only a bit. We talked about possible reasons for that. (It was an overcast day, did that slow the melting?) Then we decided we needed another day of observation to make any real conclusions.
For day two we kept the "sun" container in the sun and moved the shade container into the car. I thought for sure the car would show quick results.

Melting Crayons... easy and fun backyard science

I was wrong, but it's that what science is all about?!?! The crayons in the sun melted a lot more on day 2 than on day 1. The crayons in the car stayed exactly the same. (The same was not true of the crayon left on the floor of the car last summer. :(  Hmmm.....

Melting Crayons... easy and fun backyard science

When we do science experiments the amount of effort really depends on the mood of all involved, the experiment and the time we have to invest. This project was an all day type of thing so it was easy to add paper tracking... but often times just talking about what is happening works perfectly! Introducing words like hypothesis and conclusion in a fun, no pressure way to add to our kid's vocabulary. When I'm introducing new words I like to ease them in. "What is your hypothesis? What do you think will happen?" "Oh your hypothesis is...." What was your last science experiment? Did it turn out like you expected?


250 X 250
Jillian Riley is a writer who focuses most of her creative energy into her playful learning, playful parenting blog A Mom with a Lesson Plan. She is mom to an almost 8 year old son and a 6 year old daughter. Jillian is passionate about kid activities, learning and creativity! Find her on Facebook, Pinterest and Google.

Sunday, July 28, 2013

Gratitude Journals for Kids

Keeping kids reading, writing and learning over the summer is crucial. I recently shared that the Lil Divas were keeping a summer writing journal and enjoying fun writing prompts. Journaling is such a great way to get kids writing. Today, Jen from Kitchen Counter Chronicles is sharing a writing idea that I truly love - a Summer Gratitude Journal!

Here's Jen...........

summer gratitude journal for kids

I am excited to be visiting from my blog, Kitchen Counter Chronicles , and sharing this activity with you today. I have two daughters, who are 7 and 9 years old. They are happy, creative and smart girls, but are they grateful for all that they have? Gratitude. How can I teach my girls gratitude? I try and remind my girls how fortunate we are, to live where we live and have all that we have. The reality is that they are so young and their experiences are so limited, they really cannot understand what the word mean. This summer I decided that I wanted to find a more concrete way to help them understand what it means to be grateful. The idea of a gratitude journal seemed like the perfect tool to use. I hoped that writing in the journal, every day, would help them see all the beauty in life around them. First, I picked up a small journal, with lined pages for each of my daughters. It was important to pick a journal with lined pages, so that writing clearly would be easy. I also provided each of my girls with a pencil to write with.

  gratitude journals 

Next, I wrote a brief poem on the front page about gratitude. I thought this poem would help to inspire them and help them understand that sometimes we might be thankful for the challenges we face, not just the "happy" things that happen.

gratitude journal poem 

Finally, I spoke to each of my girls individually about her journal. I explained that they could write about whatever they like. It is up to them if they write about one thing or more. I only asked that they think about the day and write about what they are thankful for. Whatever that means...at the end of every single day. Each of my daughters had a different reaction. My youngest was excited and explained that she would be writing about 2 things each day. She wanted to put the date on each page. She wanted to number each thing she is grateful for. Her mind is very methodical and logical. I wasn’t surprised by her chosen method. My eldest daughter, on the other hand, decided to write a paragraph each day. She has a real passion for creative writing and that is exactly how her journal is structured. Each day is a new short story of gratitude. This exercise has been wonderful. My daughters have only been writing in their journals for a couple of weeks and I can see them being more thoughtful every single day. At bedtime they check in with each other to make certain they write an entry in their journals. I am so grateful for these gratitude journals. I can’t wait for the end of the summer, when we can all sit down and read them together and reflect on all the amazing things my girls are truly grateful for.


In my "previous life" I was a mental health professional...in my current life I'm a stay-at-home mom with 2 beautifully adventurous kids. I share everything that lands on our kitchen counter over on my blog, Kitchen Counter Chronicles. Swing by and learn how we are greening our lives; what we are crafting; what we are cooking and what we are reading. While you will often find the girls and I inside the kitchen, you will also find us out getting our hands dirty, exploring and learning outdoors. I can also be found on Facebook and Pinterest.

Friday, July 26, 2013

Construction Sensory Bin Play for Kids

Sensory Bins are amazing! They bring so much hands-on and creative play to life for children. I enjoyed setting up huge invitations to play in the water table of my preschool class but you can do it on a much smaller scale at home in a plastic container for one or two children to enjoy. Today OneMommy from There's Just One Mommy is sharing a fun Construction Themed Sensory Bin that is sure to be a hit with the dirt and digging lover(s) in your life. Here's OneMommy.......

If you have a little boy in your life, chances are he like cars (or trucks), and there's a good chance he likes a little dirt, too! Why not put the two together for the ultimate little boy sensory bin? We created our construction truck sensory bin so there is always a chance to play in the dirt, no matter what the weather. (Plus, it keeps my preschooler from digging in my flower bed, too!)

construction truck play 

Before starting construction, I searched the recyclables bin. I found a small cocoa can and removed the bottom. This would become our tunnel later. I also found a couple plastic lids. I decided the larger of the two would become a pond and cut the smaller one to become a bridge, which I hot glued across the top.

  dirt sensory bin

My little helper decided his bridge shouldn't advertise margarine, so I hot glued some felt across the top before adding our pond to the construction site. I found a large, shallow storage container to use for the sensory bin. We started off by putting a few shovels of dirt in the bottom. When I couldn't get the dirt to stick to the top of our tunnel, my husband suggested we make a few cardboard retaining walls.

 building a construction play area

The retaining walls held the dirt in place perfectly! Some gravel from the driveway, a few small plants, miniature construction signs, and a few cut up drinking straws acting like pipes, and the construction zone was ready for business!

  sensory bin play 

 The workers couldn't wait to get started building.

construction truck small world play 

 The best part of the sensory bin is that it is easily stored in the garage, ready for the next play session.  Looking for some other sensory fun? Check out our Sunshine Sensory Rice!    


OneMommy can be found at There's Just One Mommy, where she blogs about life as a SAHM to her 4 year-old son and 5 year-old daughter. She writes about the funny things kids say/do, simple kid crafts, learning activities, and more. You can also find her on Facebook and Twitter.

Thursday, July 25, 2013

Outdoor Cookie Cutter Games for Kids

Summertime is the perfect time for outdoor play and games. Deidre from JDaniel4's Mom has so much fun with her son. Today, she is here to share some outdoor play they enjoyed with cookie cutters and bean bags. Here's Deidre........

Outdoor Games Cookie Cutter Targets

On a beautiful summer  day when the grass was green from summer rainstorms and the sun is shining children love to get outside to play.  I introduced a new outdoor game to my son and the boy next door to explore called Cookie Cutter Targets on such a day. They in turn shared with me several other ways to play the game.

As I headed outside to supervise the boys outdoor play, I grabbed two bean bags from an old tossing game and several cookie cutters. We have quite the collection of plastic cookie cutters in various sizes. I tried to grab some large and medium size ones.

Once we were outside, I explained to the boys my new game.  “I am going to scatter these cookie cutters on the ground and you are going to try to have one of the beanbags land on one. You can have one point for each cookie cutter target you hit,” I explained. 

Throwing the Bean Bag

Each boy stood in a designated spot and tried to hit a cookie cutter when it was their turn. At first they both over or under threw the bean bag. It took a couple of minutes to get their eye and hand coordination working. Once they both were focused, they both started hitting the targets.

Oops! The Beanbag went to far!

After awhile they both noticed that if you hit the edge of the cookie cutter targets hard enough, you could make them flip.  They decided that was very cool and within seconds the game changed to a new outdoor game called Flip The Cookie Cutter Targets.

Later the game changed again to Tell Me What Target To Hit. One boy would tell the other which cookie cutter to aim for. If they hit the correct cookie cutter, then they got a point. I noticed that neither of the boys was selecting the large cookie cutters for their friend to hit. They went for the trickier,  smaller ones. 

The boys had a great time with the original outdoor cookie cutter target game, but I think they had a better time creating their own outdoor games with cookie cutter targets.  Watching children create and change the outcomes of a game is such amazing fun.


Deirdre Smith writes/owns JDaniel4’s Mom. After twenty years as a teacher, she became a stay at home mom . Her blog features ways she and her 5 year old are exploring learning, crafting, creating healthy meals and living life to its fullest. Deirdre can also be found on twitter as @jdaniel4smom and on her blog's FB page.

Tuesday, July 23, 2013

Shower Curtain Sight Word Activity for Kids

Are you ready for an easy sight word and writing activity for kids? You know I like utilizing things around the house for learning fun but Dyan from And Next Comes L outdid herself with a re-usable Shower Curtain Sight Word Activity.  Here's Dyan to tell you all about it........
Hi!  I'm Dyan and I blog over at And Next Comes L.  I am a stay at home mom to two boys, but I also teach piano from my home.  My passions are music, writing, and anything arts and crafts wise.  My two boys keep me busy.  J will be four in September and is a very bright child who started to read and spell before he turned two.  Shortly after he turned three, that passion for reading and spelling turned into writing everything by himself.  K will be two in September and is a busy monkey.  He climbs everything!  He is following in his big brother's footsteps as he too has learned all of his letters, uppercase and lowercase, by 20 months of age.  So I am sure he will be an early and avid reader just like J!  
I am so excited to be guest posting on Mom to 2 Posh Lil Divas today.  I have always admired the sight word activities that Bernadette comes up with for her girls.  Since J is a sight reading pro, naturally, I had to make my guest post about sight words!
I have mentioned before that I have inherited a large box of shower curtains and shower curtain rings.  As a result, I have been using them for all sorts of different activities with my boys.  Since shower curtains wipe clean so easily, I figured that I could write on them using window markers.  And if you have read my blog before, you will have noticed that I love window markers and have written on many different surfaces, including Mega Blocks here and here.  So I decided to get some sight word practice in with J using a shower curtain and some window markers.


One rainy day, while K was napping, I set up this sight word activity for J.  I taped a shower curtain to my kitchen floor using some duct tape.  Then I wrote a variety of sight words, from different grade levels, using the window markers.  I tried to choose some words that I knew J could already read, but I also picked a few that I was unsure of whether or not he could read.  To my surprise, there were only two or three that actually stumped him.  Oh, how my three year old surprises (and challenges!) me on a daily basis!

The set up.
All ready to go for some rainy day learning.
I also gave him a window marker, in a different color, to practice writing.  Within a few seconds of me handing him the marker, he started reading and then tracing the letters of the sight words.

Tracing letters.
A close up of J's letter tracing.
J concentrating really hard.
Tracing the word "write."
J's finished tracing of the word "write."
This activity was great for helping J practice his lower case letter writing since when he does "little letters" (as he calls them), they often end up very jagged and sharp.  It was a great writing and reading exercise for him.  However, this activity could be modified to practice letter identification and writing too.

To clean up, I just tossed the shower curtain in with some dirty laundry so that it's ready to be used again!  And if you're looking for others way to learn and play with shower curtains, check out my homemade play parachute made from shower curtains and my shower curtain ring counting activity.  You can also check out my other sight word activities here.

If you enjoyed this post, please be sure to check out my blog, join me on Facebook, or follow me on Pinterest.

- Dyan

Monday, July 22, 2013

Wild Swans Storytelling Set

Crafts are a wonderful way to extend a children's book and ignite a love of reading. Today, Kate from The Craft Train is here to share an easy paper roll craft to go with the fairytale The Wild Swans. Paper rolls have so much possibility, don't they? Here's Kate to tell you how she transformed them into magnificent swans......


It's no secret that we here at The Craft Train adore toilet roll crafts. We can't get enough of them. Recently, we made easy toilet roll swans and a princess to go with them, characters from the fairy tale The Wild Swans. My two girls loved making the characters, role playing with them as we read the story and making up stories of their own by incorporating numerous toys from their toy box. We stretched this craft out over a couple of days, which is a good way to do it if the kids are little and don't have a long attention span. This is how we made them -

You will need:
• Toilet rolls, there are 11 brothers that become swans in the story so to be accurate you would need 11 rolls - but you can get the picture with half as many, plus 1 princess
• Scissors
• Paint
• Feathers, felt (or colored paper) and glue
• Black fine point marker
• String for hair on the princess, or you could use more felt
• Goggly eyes for the princess (optional)
How to:


First get your hands on a copy of The Wild Swans. Ours is in a mixed collection of fairy tales I found at the local Op Shop for $1. I have spoken about my addiction to pretty vintage picture books before in my post on Tissue Paper "Stained Glass" bookmarks, and can often be found scouring local shops for old treasures at bargain prices. This one is a relatively recent 90's copy with beautiful pictures and well told tales my kids love to listen to.

Folding the swan
Start with an ordinary toilet roll


Squash it flat


Like this


Make a long cut at a sharp angle lengthways from the top corner


Then a cut at a slight angle across-ways about a third of the way up from the bottom of the roll. The two cuts need to meet, and this should cut the toilet roll into two pieces. One piece becomes the swan


Use the other piece for whatever you like. My kids pretended to be pirates with them.


This is the swan piece. Pop it back into the shape of a roll, but with slight corners at the front and back.


Bend the top tip of the long piece downwards to make the swan's graceful neck.


We made the full 11 swans!


Decorating the characters:


Swans are usually white but to add a bit of interest we painted ours in a rainbow of shades.


For best effect paint the inside of the roll too. My kids didn't want to (we had 11 to paint!)


Lovely work! Leave these to dry before starting the next part. As you can see here, the paint was slapped on rather thick so ours needed overnight drying time.


Give the princess a pink face by painting just the top part of the roll, the bottom will be covered with felt for the dress.


Once dry, stick on the feathers and little triangle felt beaks. Draw on little eyes with a black marker for the swans. The princess can have googly eyes if you like, or just draw them on too. Then decorate her with a felt dress, string hair and a felt crown.


They had fun sticking on multi colored feathers.


Isn't it darling?

Time to Play


We made two princesses, one by me and one by Miss R. My princess became the nasty queen in the story.  


 As you read the story let them play it out with the characters you have made. You won't have every character in the book unless you make a few extra (the king and the handsome prince for a start), but that doesn't matter.


They can make up their own games when you are finished. Our characters have their own cardboard box castle we made last school holidays, the girls still play with it nearly every day, but it's starting to look a bit tired and old now so I think we'll soon have to make a new one :-) 

Hi, I’m Kate. Thank you for reading my guest post on one of my favorite blogs, Mom to 2 Posh Lil Divas.


 I have lots more fun craft ideas over at www.thecrafttrain.com, come visit and follow along, we'd love to have you there. You can also find us on Facebook or Pinterest